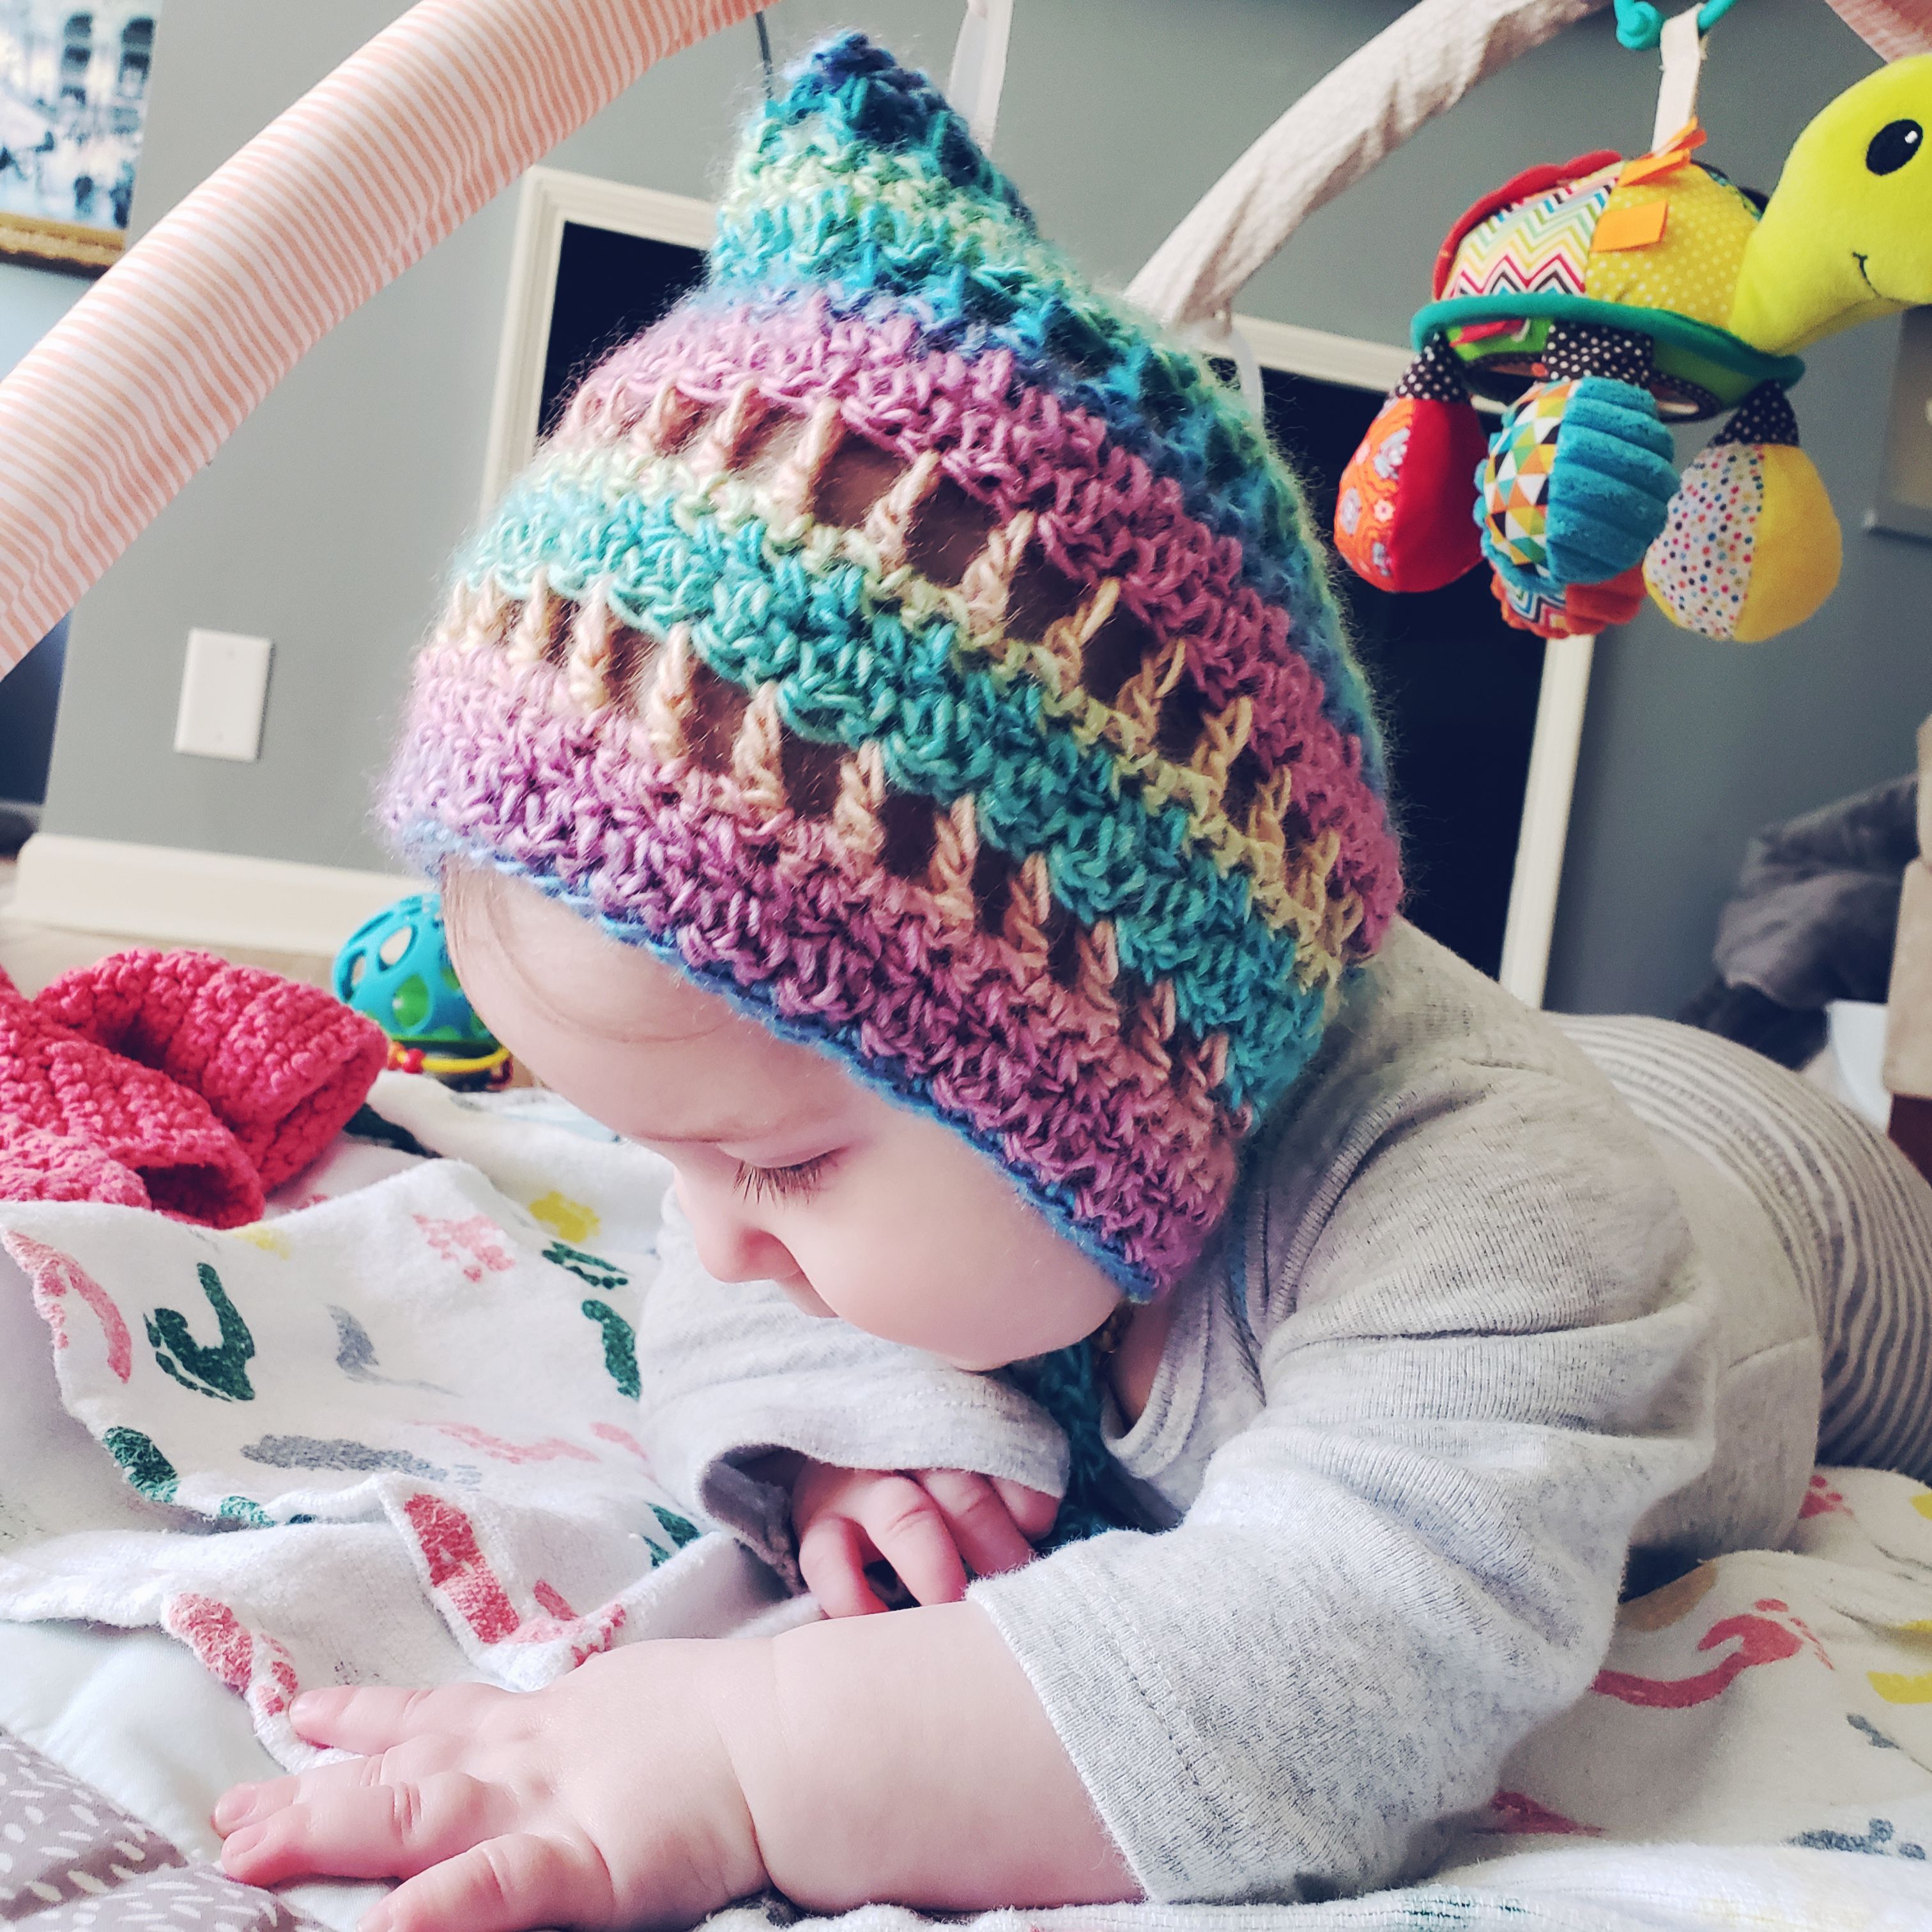
For more finished bonnet images, check out my Instagram @kaminakapow
Note: This hat is crocheted with a loose tension. If you’re a super tight crocheter or you’re used to making amigurumi you’ll need to loosen your grip a bit or consider going up a size. If you tend to get consistent results when following crochet clothing patterns, I wouldn’t worry about your tension.
Level: Easy
Time: I can finish one in about an hour and a half, so I’d give yourself at least 3 hours if you’re not an experienced crocheter. I am not fast to respond to comments, so if you’re making this at the last minute, be aware it may be days before I get online to see your questions.
Supplies Needed:
Scissors
Tapestry Needle
Hook: 4mm (G)
Yarn: (3) DK weight, I recommend cotton as this is intended to be a bonnet for spring or a cool summer morning and cotton is breathable and soft for babies.
Stitches Used (US terms):
Chain
SC – Single Crochet
DC – Double Crochet
Slip stitch
Yarns I have had consistent success with:
Patton: Grace (cotton)
Loops & Threads: Joy DK Tricot Double (acrylic),
Lion Brand: Ice Cream Big Scoop
Yarn that is slightly off-size:
Bernat: Softee Baby Cotton (comes out one whole size larger despite being a DK weight)
Loops & Threads: KAI (comes out slightly smaller, but not by much.)
And finally, I also tried a worsted weight (featured image at top) because it’s lighter than most worsted weights and I loved the color:
Red Heart: Unforgettable, comes out one whole size larger.
__________
This pattern is being released for free because it is my first clothing pattern and I’m looking for feedback from those of you willing to test it in its early stages. If you post the results on Instagram please tag me! @KaminaKapow
***There are reference images at the end of this post***
__________
SIZE 3-6 Months
When laid in a flat square, the finished bonnet should measure about 15cm from back to front (measure this near the top), and about 15cm from top to bottom
R1 – Chain 24, starting in the second chain from hook, SC in next 22 chains, in the last chain SC 3 times. Rather than turning, continue around to the other side of the chain. SC in the 22 chains on the other side. (47)
chain 3, turn
R2 – The 3 you chained will count as a DC and chain 1 coming from the first stitch, skip the next stitch and then DC in the 3rd stitch. See photo for clarification. *chain 1, skip next stitch and DC into following stitch* repeat until the end of the row (47) You should have 23 chain spaces total. (Images A-C show this row)
chain 1, turn
R3 – SC two times in each chain space. (46)
chain 1, turn
R4 – *SC in first stitch, DC in next* repeat to end of row (46)
chain 1, turn
R5- Same as Row 4, but in the very last DC add an additional SC (47)
chain 3, turn
R6-9 Repeat rows 2-5 (Image B shows what it will look like at the end of Row 6)
chain 3, turn
R10-13 Repeat rows 2-5
chain 3, turn
R14-17 Repeat rows 2-5 with one change, do not add the extra SC at the end of row 5. Row 17 will end in 46 stitches
chain 1, turn
R18- SC in each stitch (46)
chain 1, rather than turning, rotate the bonnet to begin crocheting along the bottom edge.
BOTTOM EDGE and STRAPS
(See Images D through H at the end of this post)
In each solid space, place 2 SC, and in each chain space place 2 SC, make sure the last SC lands on the corner of the bonnet in the Chain space from the start of row 18. This doesn’t need to be exact, but the closer to the corner it is, the more seamless the bonnet will look. (34)
First strap: chain 25, turn, starting in the second chain from hook SC in the next 24 chains.
Return to the bottom of the bonnet
SC in each stitch (34)
Second strap: chain 25, turn, starting in the second chain from hook SC in the next 24 chains.
Slip stitch in the corner, finish off and weave in ends.
__________
SIZE 6-9 Months
When laid in a flat square, the finished bonnet should measure about 16cm from back to front (measure this near the top), and about 16cm from top to bottom
R1 – Chain 26, starting in the second chain from hook, SC in next 24 chains, in the last chain SC 3 times. Rather than turning, continue around to the other side of the chain. SC in the 24 chains on the other side. (51)
chain 3, turn
R2 – The 3 you chained will count as a DC and chain 1 coming from the first stitch, skip the next stitch and then DC in the 3rd stitch. See photo for clarification. *chain 1, skip next stitch and DC into following stitch* repeat until the end of the row (51) You should have 25 chain spaces total. (Images A-C show this row)
chain 1, turn
R3 – SC two times in each chain space. (50)
chain 1, turn
R4 – *SC in first stitch, DC in next* repeat to end of row (50)
chain 1, turn
R5- Same as Row 4, but in the very last DC add an additional SC (51)
chain 3, turn
R6-9 Repeat rows 2-5 (Image B shows what it will look like at the end of Row 6)
chain 3, turn
R10-13 Repeat rows 2-5
chain 3, turn
R14-17 Repeat rows 2-5
chain 3, turn
R18-19 Repeat rows 2-3
chain 1, turn
R20- SC in each stitch (50)
chain 1, rather than turning, rotate the bonnet to begin crocheting along the bottom edge.
BOTTOM EDGE and STRAPS
(See Images D through H at the end of this post)
In the first and last sold areas (at the start and end of the row) place 1 SC, for the rest, in each solid space, place 2 SC, and in each chain space place 2 SC, make sure the last SC lands on the corner of the bonnet in the Chain space from the start of row 20. This doesn’t need to be exact, but the closer to the corner it is, the more seamless the bonnet will look. (34)
First strap: chain 25, turn, starting in the second chain from hook SC in the next 24 chains.
Return to the bottom of the bonnet
SC in each stitch (34)
Second strap: chain 25, turn, starting in the second chain from hook SC in the next 24 chains.
Slip stitch in the corner, finish off and weave in ends.
__________
SIZE 9-12 Months? Maybe even up to 18 months?
This is the only size I didn’t have a baby to test on, so feedback on your results will be helpful until the baby I care for grows a bit. Leave a comment here or on my Instagram @KaminaKapow to let me know if this sizing worked out for you. Be sure to include what type of yarn you used.
When laid in a flat square, the finished bonnet should measure about 17cm from back to front (measure this near the top), and about 17cm from top to bottom
R1 – Chain 28, starting in the second chain from hook, SC in next 26 chains, in the last chain SC 3 times. Rather than turning, continue around to the other side of the chain. SC in the 26 chains on the other side. (55)
chain 3, turn
R2 – The 3 you chained will count as a DC and chain 1 coming from the first stitch, skip the next stitch and then DC in the 3rd stitch. See photo for clarification. *chain 1, skip next stitch and DC into following stitch* repeat until the end of the row (55) You should have 23 chain spaces total. (Images A-C show this row)
chain 1, turn
R3 – SC two times in each chain space. (54)
chain 1, turn
R4 – *SC in first stitch, DC in next* repeat to end of row (54)
chain 1, turn
R5- Same as Row 4, but in the very last DC add an additional SC (55)
chain 3, turn
R6-9 Repeat rows 2-5 (Image B shows what it will look like at the end of Row 6)
chain 3, turn
R10-13 Repeat rows 2-5
chain 3, turn
R14-17 Repeat rose 2-5
chain 3, turn
R18-21 Repeat rows 2-5 with one change, do not add the extra SC at the end of row 5. Row 21 will end in 54 stitches
chain 1, turn
R22- SC in each stitch (54)
chain 1, rather than turning, rotate the bonnet to begin crocheting along the bottom edge.
BOTTOM EDGE and STRAPS
(See Images D through H at the end of this post)
In each solid space, place 2 SC, and in each chain space place 2 SC, make sure the last SC lands on the corner of the bonnet in the Chain space from the start of row 22. This doesn’t need to be exact, but the closer to the corner it is, the more seamless the bonnet will look. (42)
First strap: chain 25, turn, starting in the second chain from hook SC in the next 24 chains.
Return to the bottom of the bonnet
SC in each stitch (42)
Second strap: chain 25, turn, starting in the second chain from hook SC in the next 24 chains.
Slip stitch in the corner, finish off and weave in ends.
__________
Reference Photos
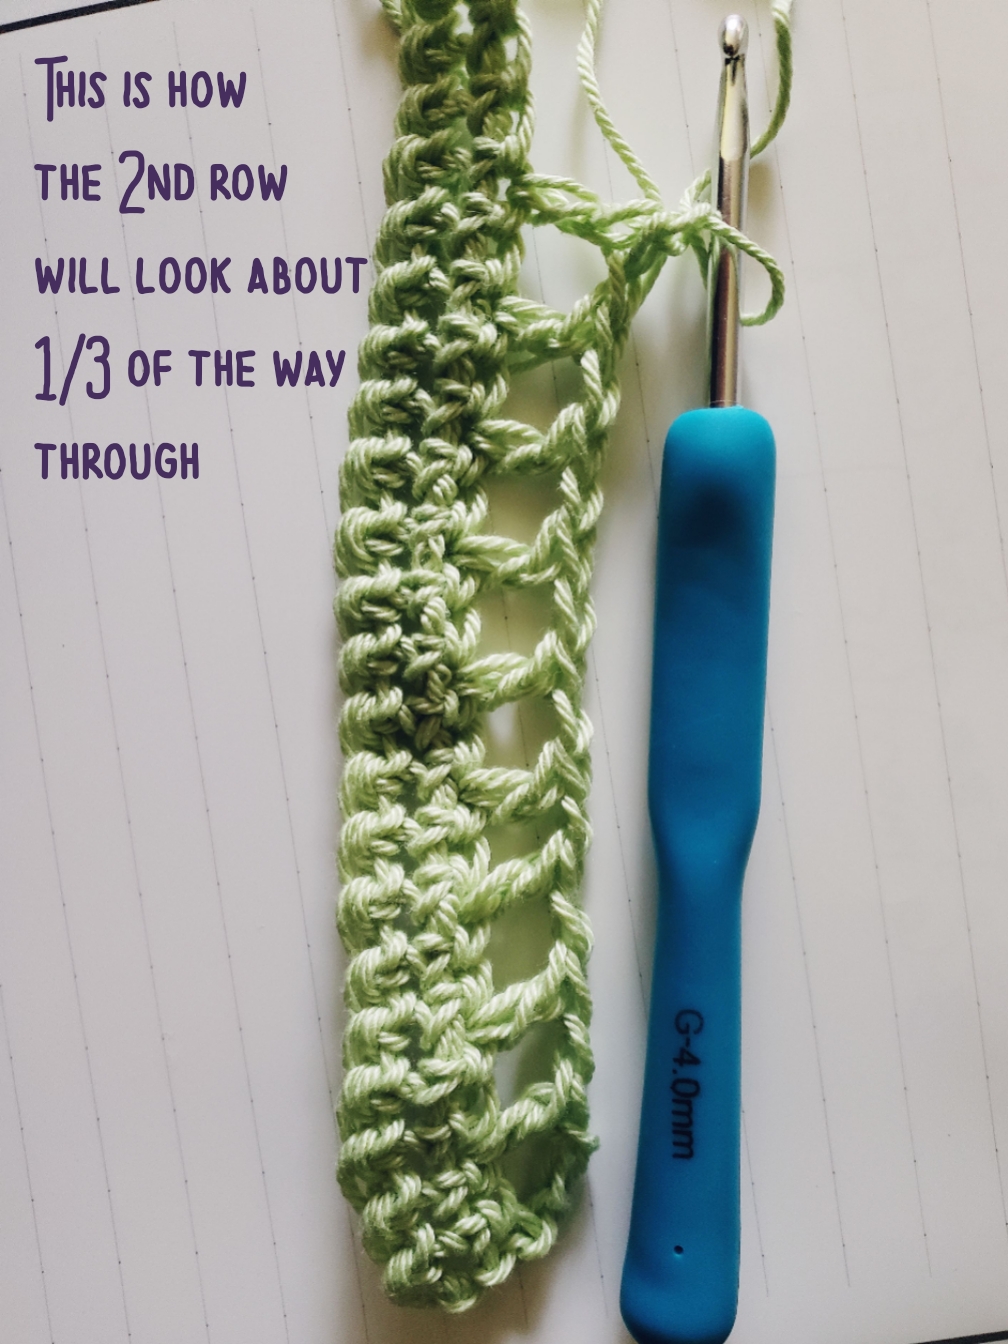
Image A.
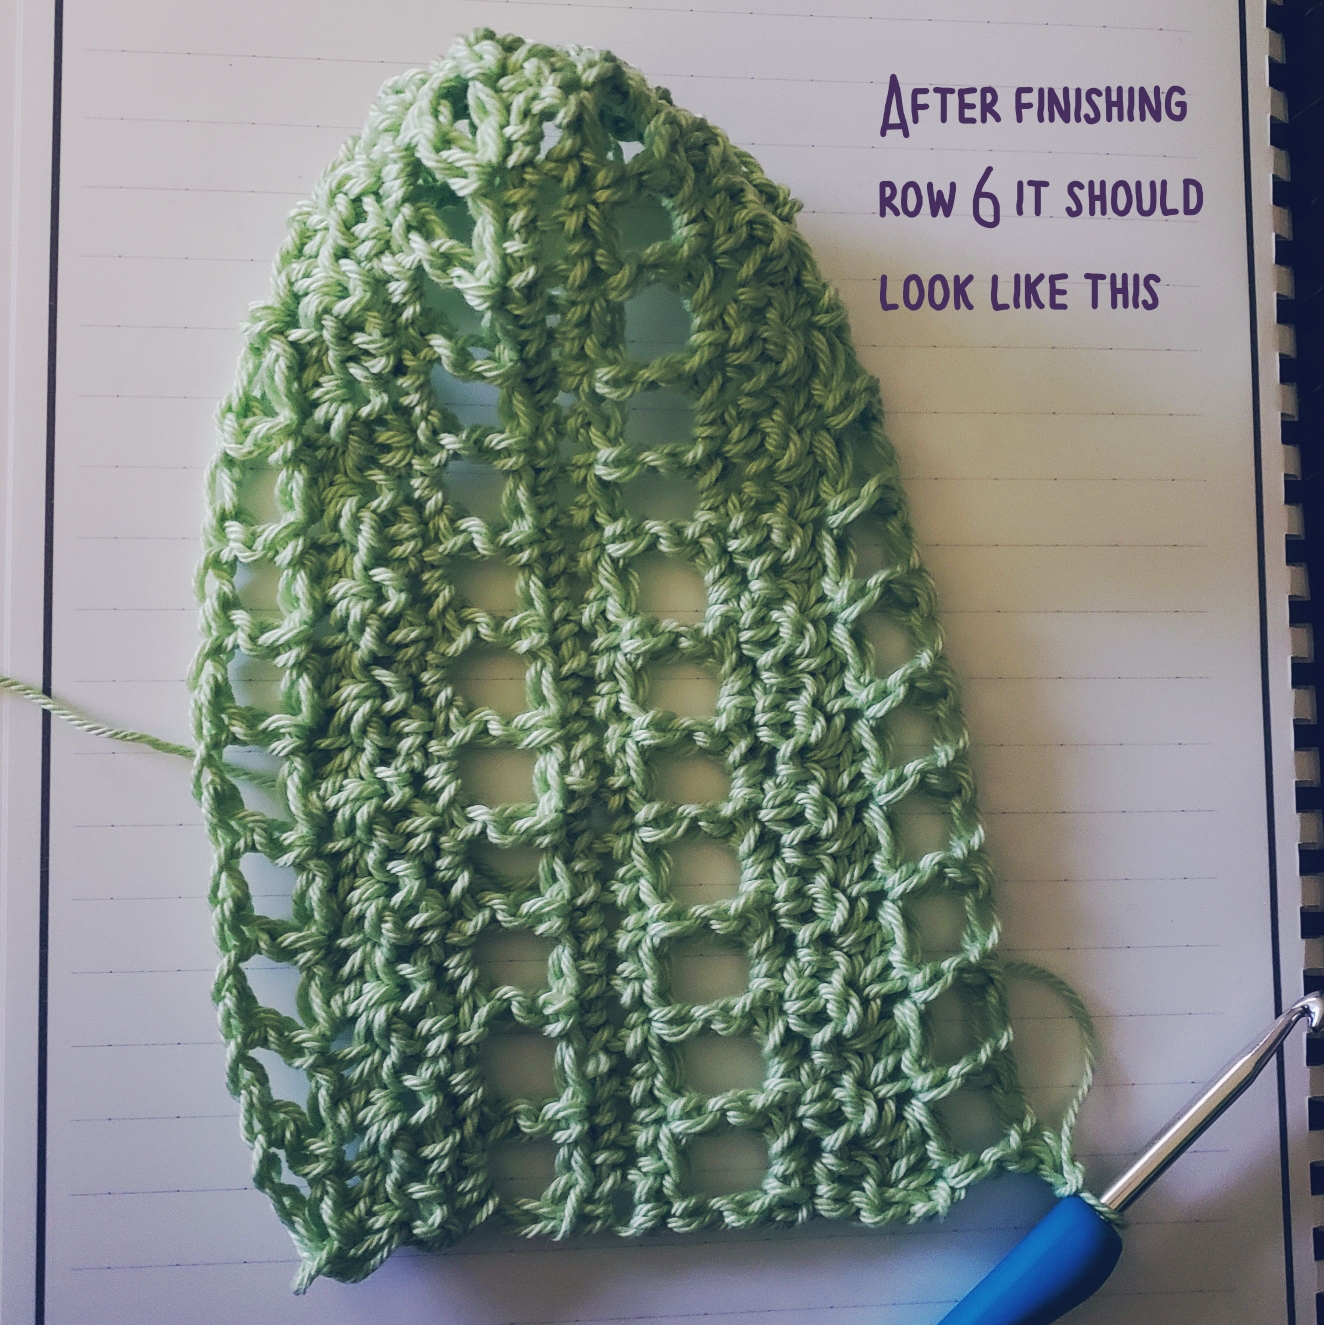
Image B
.
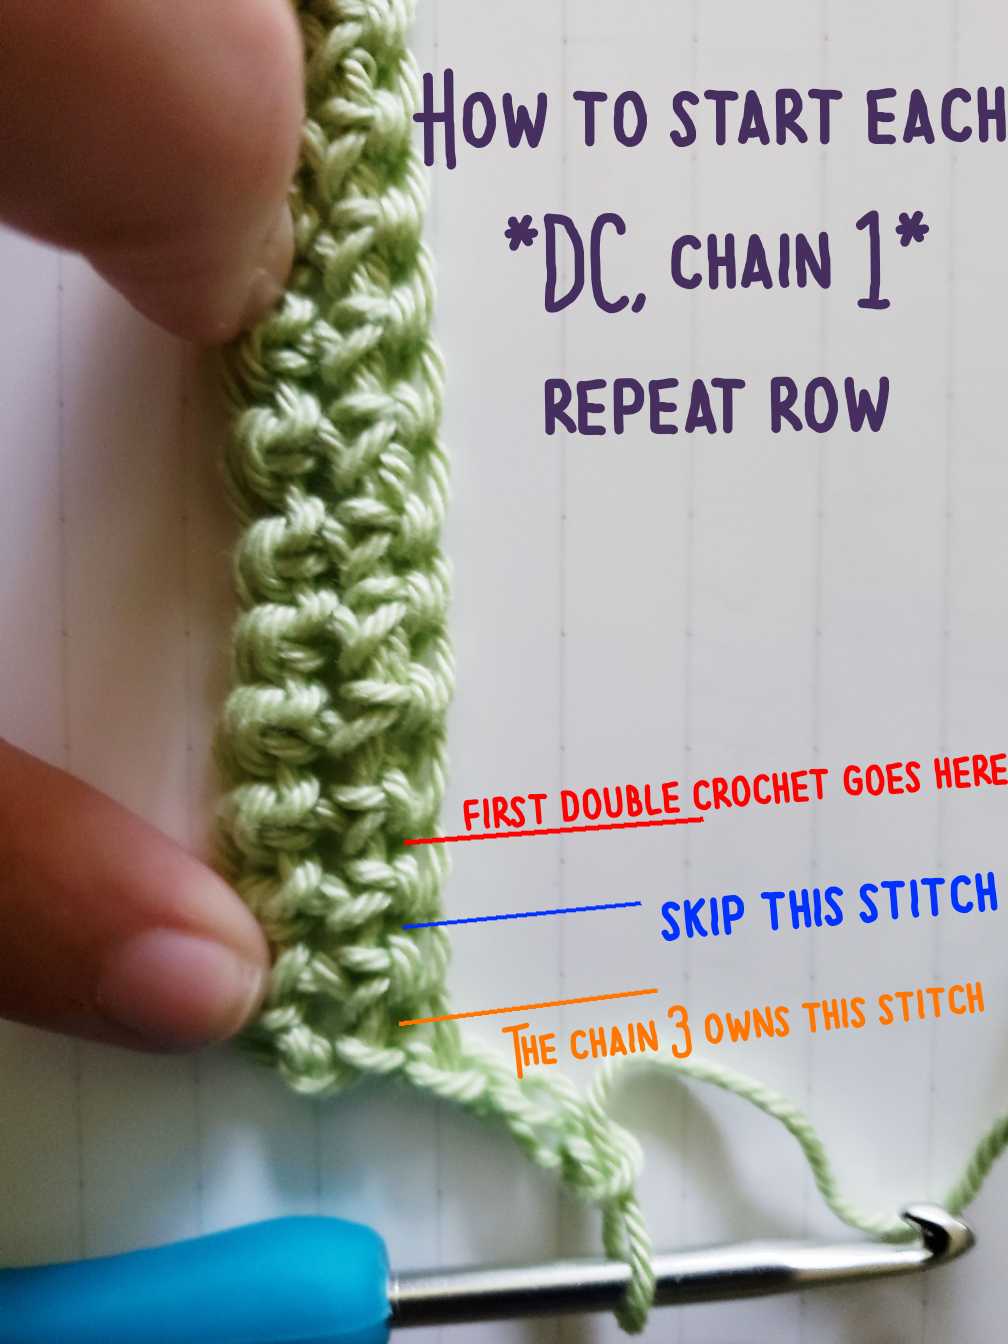
Image C
.
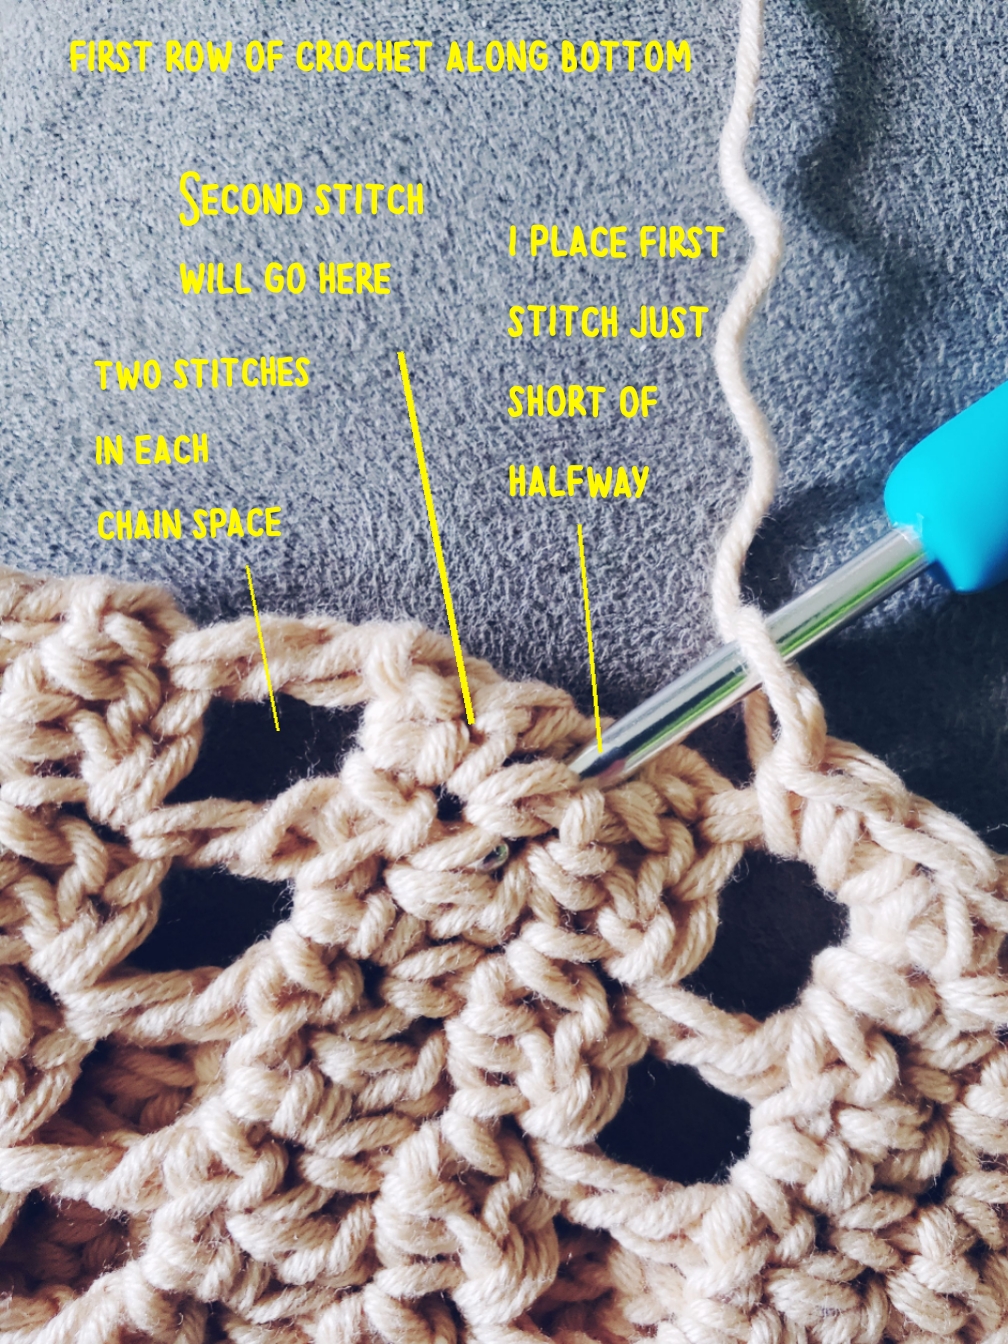
Image D
.
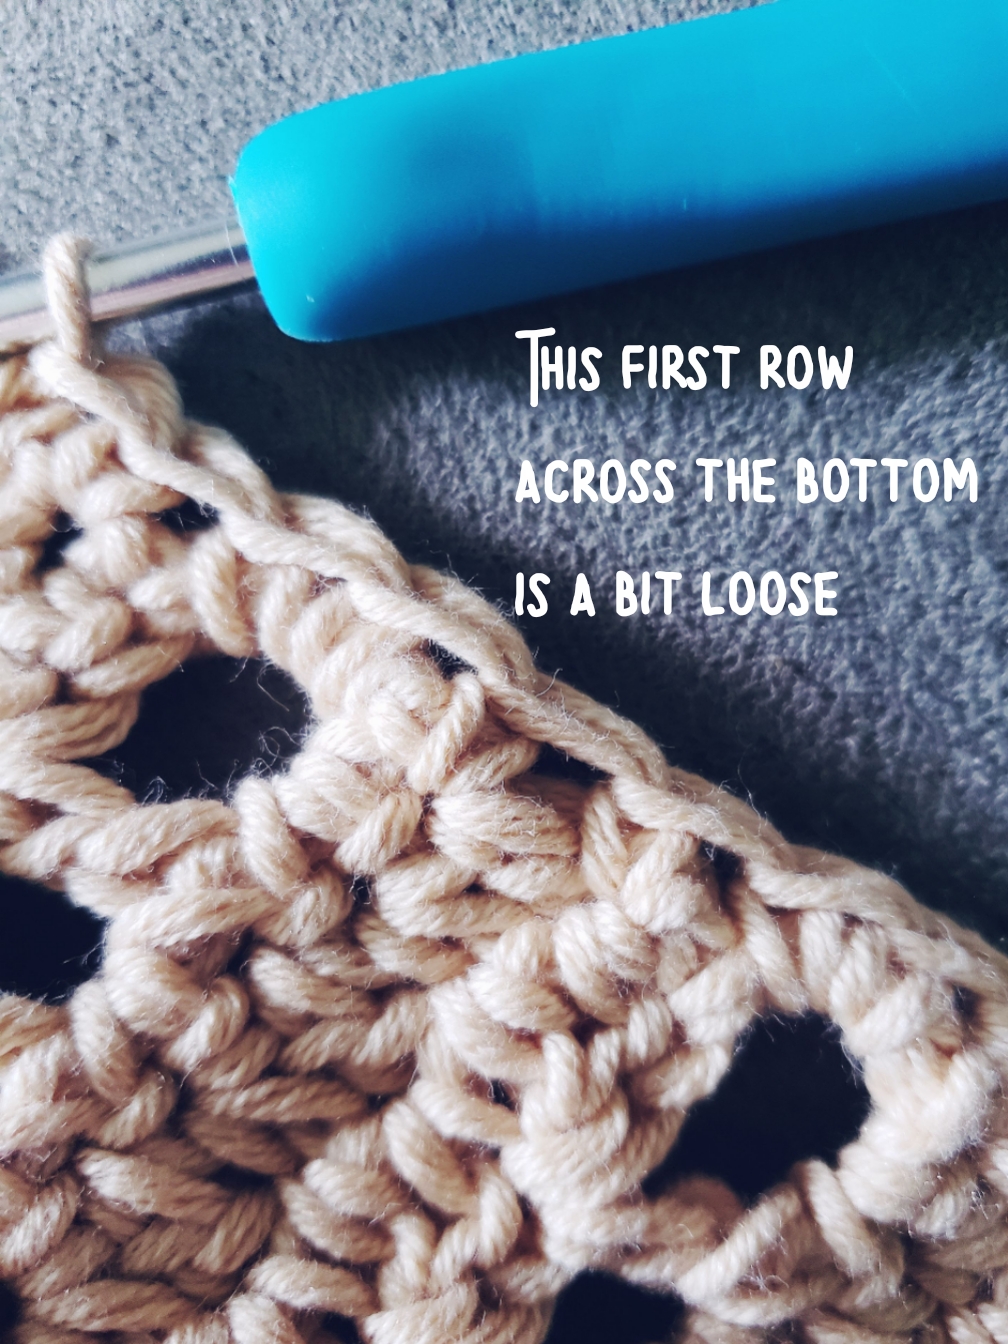
Image E
.
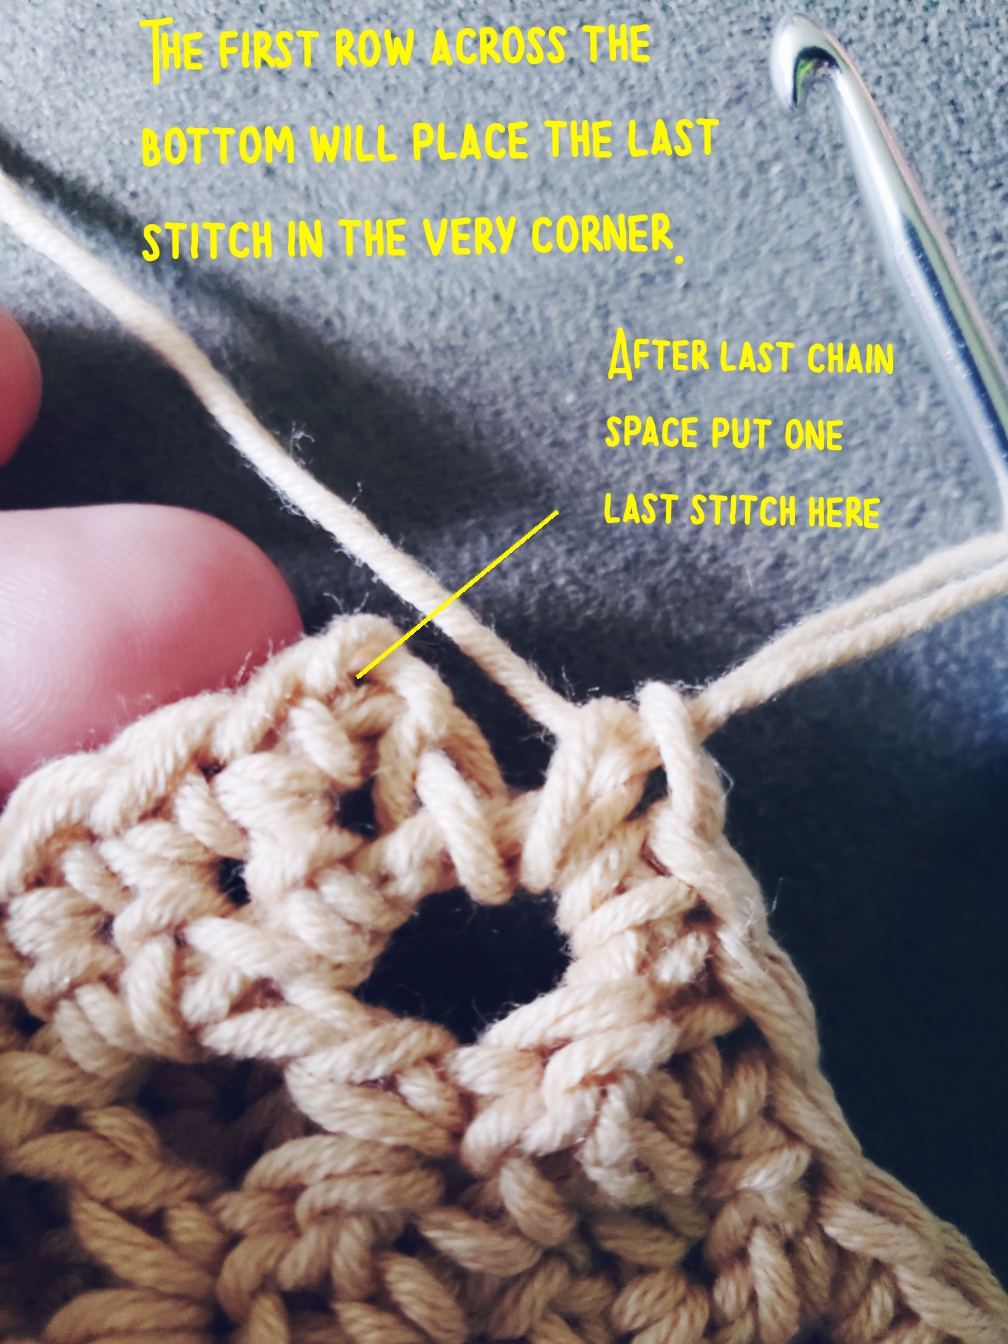
Image F
.

Image G
.
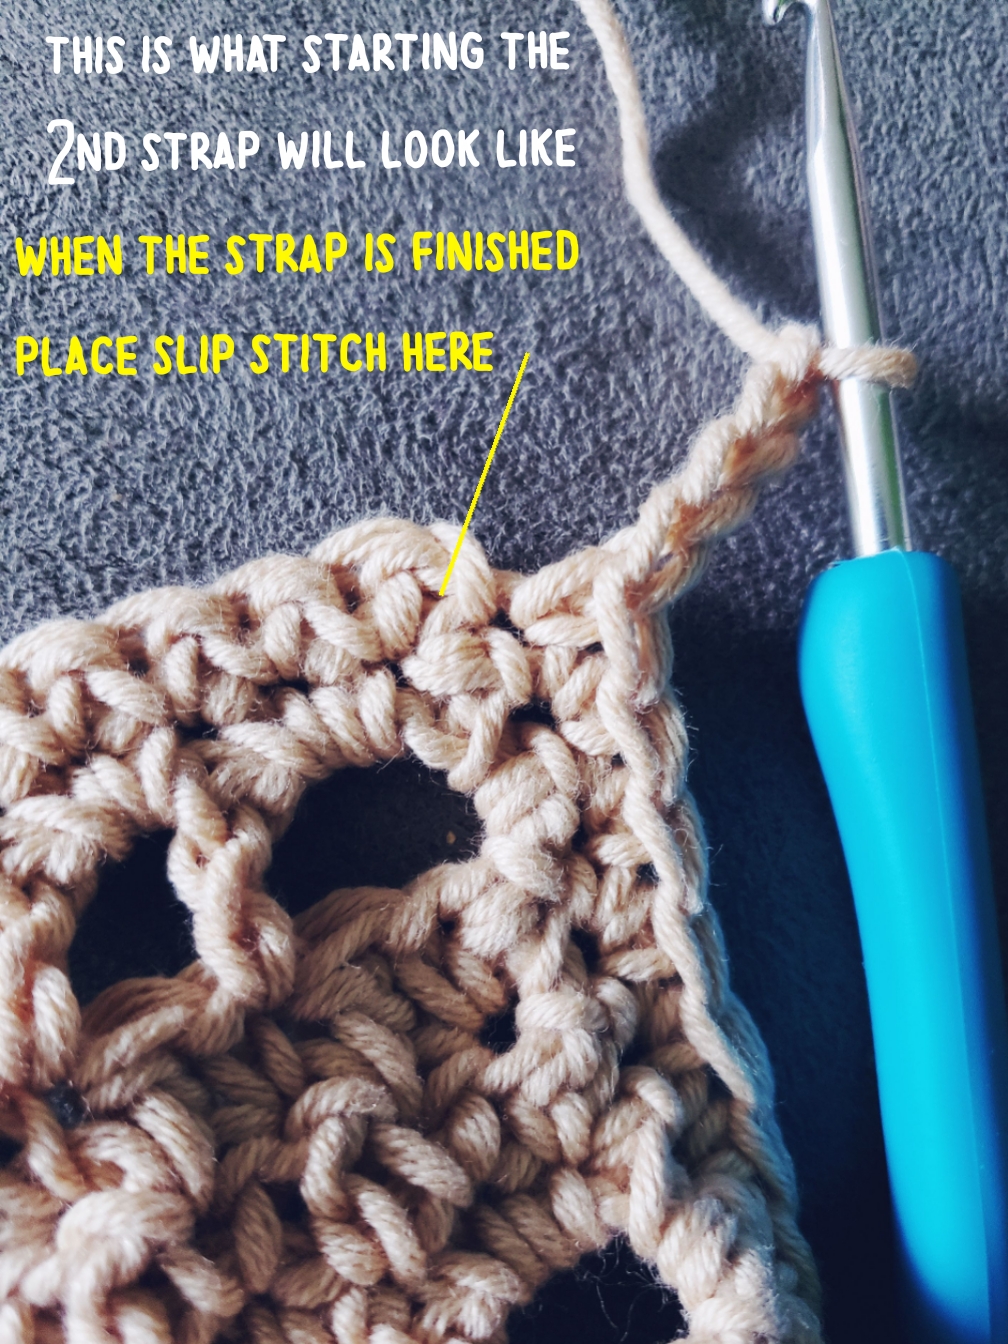
Image H